Posts

New Brake Master Cylinder is in.. still no brakes. UPDATE

Image
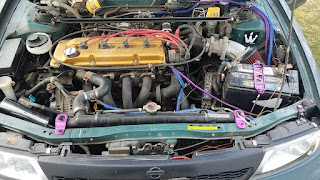
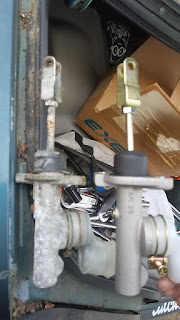
So I recently replaced with a Centric brand u13 brake master cylinder. required me breaking the tabs holding the fluid level sensor, as it was facing the wrong direction (probably for right hand drive?) Properly bench bleeded and pumped brakes a bunch of times.. put cap back on and lost pressure once again.  Didnt see any leaking fluid from up top or around car.. so next step is to put her on ramps and jack stands and fill up and go thru the lines with a flash light and try to find it that way. debating on using UV dye which would make the detection easier with a black light.. but man. more money. yeesh. already ordered two new rear hoses... One is Dorman brand the other is Beck Arnley.. different brands as they were the cheapest two on amazon. $16  for both compared to $24  ea at Autozone.  Already have two front stainless braided Rotora front lines waiting to go in. Also got 2 feet of steel 3/16" line and a compression fitting union and tubing cutter juuusst in case. Hopefully i

Two Tone project has started.. rattle can style.. lol

Image
Still gotta do the roof and other side, and resand oxidation on hood.. but i like it. :)

MSD 6AL vs StreetFire CDI

I've had a few people ask me about the CDI box and what it does and is it necessary etc etc... Its basically the next step in scavaging whatever power is to be found in an engine. You can help an engine breath by putting more air and fuel in and getting it out thru compression, induction, cams.. etc.  but the another way to fine tune the process is thru timing and burn efficiency. The MSD 6AL is a standard for drag and other applications, but the StreetFire is perfectly fine for a 4 banger with supporting components.  What are supporting components? Well the rest of the ignition system needs to be able to support the extra coil winding power. Here's my set up in addition to the StreetFire CDi  1) low impedence (ohms) spiral wound copper core (radio supression) wires. I have Magstar Racing 100, but Magnecor, Accel,  MSD, VMS (claim the lowest ohms in indistry), or others should work fine too.  2) non resistor spark plugs.. the resistor, and fine electrode iridium tips are perfec

AIP Dragon Fire Distributor Installed

Image
Small progress today. No write up, the diz install is pretty straight forward. Unplug harness connector, remove two bolts, make sure new unit's rotor is facing same direction as old one. (dotted notch on cam side of rotor is the side of the brush).. notch on top of cam journal should match diz.. or advance/retard as u need. Also put in the non-resistor NGK's. (Stock#4930) BCP6ES .. meant for Saab's, but look identical and fit perfect, overgapped to .550.. we'll see if that needs to be adjusted before the StreetFire CDI is installed.  Also removed timing chain upper guides.. and cleaned off valve cover.. also found that the spark plug hole gaskets werent aligned from when I installed the Magnum MaxDry gasket.. so I had to make sure they were right this time.  Also removed refridgerant line off the fire wall.. pointless since I have no AC. will remove condensor and side canister soon.  Tomorrow Im getting a temporary battery, so hopefully I'll get some driving video i

Installed puke tank, reinstalled strut bar

Image
So while my car is sitting waiting for a new battery.. i decided to reinstall the strut bar, and installed a coolant puke tank from summit racing.. . I was going to mount to ac condensor, but im taking that out. so i decided to put right where old one stood..  i had to use an old aluminum mounting bracket.. but worked like a charm.. also stuck two rubber adhesive pads at contact points.. i dont expect it to rub thru the billet aluminum, but hopefully the pads keep vibration noise to minimum. need to purchase 2' feet of coolant overflow hose.. stock is short by about 8"...  next up for tanks is the billet Weapon R power steering reservoir.. need to order  new lines.. old ones are rock hard and cracked. 

PITA CLUTCH MAST. CYL. REPLACEMENT

Image
Exedy/Daiken Clutch, Clutch Master Cylinder This little project is quite the pain. The space issue is quite the mess. Alot of bolts broke (havent been touched in 24 years).  I recommend spraying all bolts in penetrating oil before attempting. 1) Remove rod/pin and cotter pin connecting cylinder rod to clutch pedal 2)remove 3 nuts from cruise control pump (one up top on strut tower, two in wheel well.. all 3 broke for me).. 3)remove black relay box on strut tower (i didnt.. in retrospect that would have made it easier 4) if cylinder isnt already dry, drain fluid by opening valve on slave, and pump clutch pedal 5)loosen and remove hydraulic line from master cylinder. remove reservoir cap. 6) loosen and remove two 12mm spinning nuts attaching cylinder to fire wall (this is the biggest headache i had as my open end wrench rounded the corners.. there isnt enough space for deep sockets and the studs go thru the nuts over 1cm.. offset wrench or pass thru socket is require. i used pass thru so

Altima u13 Ka/Sr photo dump

I know its been over a year since I have updated anything, but after my nerve biopsy in May 2017 my mobility was cut back a great deal. I still have not healed completely as half of my foot is comepletely without feeling, yet in crushing pain at the same time. I have emptied out over 500 Altima related photos i have gathered from the internet and put them in one photbucket folder. some other model cars appear, and some are just product numbers i screen shotted.. also a diagram or two. if you see your car and want it removed, plz contact me and i will gladly do so. http://s1309.photobucket.com/user/salasfamily2009/library/u13%20Altima%20KA%20SR%20photos%20ideas