Posts

Installed puke tank, reinstalled strut bar
Image
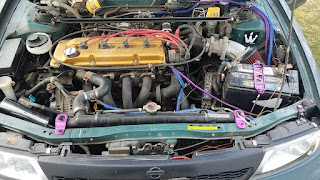
So while my car is sitting waiting for a new battery.. i decided to reinstall the strut bar, and installed a coolant puke tank from summit racing.. . I was going to mount to ac condensor, but im taking that out. so i decided to put right where old one stood..  i had to use an old aluminum mounting bracket.. but worked like a charm.. also stuck two rubber adhesive pads at contact points.. i dont expect it to rub thru the billet aluminum, but hopefully the pads keep vibration noise to minimum. need to purchase 2' feet of coolant overflow hose.. stock is short by about 8"...  next up for tanks is the billet Weapon R power steering reservoir.. need to order  new lines.. old ones are rock hard and cracked. 
PITA CLUTCH MAST. CYL. REPLACEMENT

Image
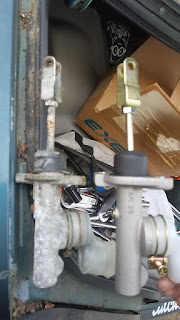
Exedy/Daiken Clutch, Clutch Master Cylinder This little project is quite the pain. The space issue is quite the mess. Alot of bolts broke (havent been touched in 24 years).  I recommend spraying all bolts in penetrating oil before attempting. 1) Remove rod/pin and cotter pin connecting cylinder rod to clutch pedal 2)remove 3 nuts from cruise control pump (one up top on strut tower, two in wheel well.. all 3 broke for me).. 3)remove black relay box on strut tower (i didnt.. in retrospect that would have made it easier 4) if cylinder isnt already dry, drain fluid by opening valve on slave, and pump clutch pedal 5)loosen and remove hydraulic line from master cylinder. remove reservoir cap. 6) loosen and remove two 12mm spinning nuts attaching cylinder to fire wall (this is the biggest headache i had as my open end wrench rounded the corners.. there isnt enough space for deep sockets and the studs go thru the nuts over 1cm.. offset wrench or pass thru socket is require. i used pass thru so...

Altima u13 Ka/Sr photo dump

I know its been over a year since I have updated anything, but after my nerve biopsy in May 2017 my mobility was cut back a great deal. I still have not healed completely as half of my foot is comepletely without feeling, yet in crushing pain at the same time. I have emptied out over 500 Altima related photos i have gathered from the internet and put them in one photbucket folder. some other model cars appear, and some are just product numbers i screen shotted.. also a diagram or two. if you see your car and want it removed, plz contact me and i will gladly do so. http://s1309.photobucket.com/user/salasfamily2009/library/u13%20Altima%20KA%20SR%20photos%20ideas

AT Throttle Body Swap, and JDM intake goodie info..

Image
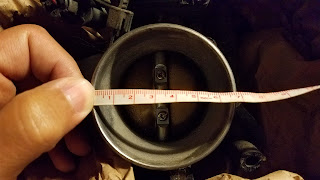
 the AUTOMATIC throttle body is 66.5-67 mm on the intake side of things and 60mm on the plenum gasket side. Make sure to get the same year throttle body when making the switch, because TPS suppliers may have changed between OBD and OBD2 years, not verified though. Also, the Apex'i S13 Power Intake part no. 507-N004 bolts directly onto the stock 80mm inlet MAF. no need for odd fitting MAF adaptors, plus if you're into JDM brand stuff.. points for you. hahaha. Its a pricey intake brand new, but the Apex'i Power Intake filters alone have shown more gains than K&N, Injen, HKS/GReddy mushrooms and the like. Lots of engineering r&d goes into these filters. retail is $100 for filter alone. intake kit is $180-220 shipped.

To Do List - Eddies Summer Plan - stage 1 a.k.a. fixing sh*t

i'll try to put this in chronological order, everything i need to do starting hopefully this week.. Front/Engine Bay: - compression test - vacuum engine bay - Remove front bumper cover/ foglights - airbag sensor remove - Remove Hood and Strut Bar - Remove AC Condensor and side tank (trash), remove radiator and coolant tank , remove and rebuild/ replace alternator - install new Mishimoto TS, paint water elbows - remove timing chain guide, inspect inside valve cover, pour a drop of sea foam onto pistons.. - remove intake manifold, tb, rest of egr stuff, redo bypass for summer - remove intake and MAF, clean maf - gasket match and polish IM, clean IM new AT 65mm tb, file down butterfly bar and plate edge, replace throttle rod - clean head side, clean fuel rail, paint - replace pcv valve - install billet fuel bracket - new fuel lines with AN6 fittings - new DC2 fuel filter with AN6 fittings - replace clutch MC and Slave Cylinder, bleed - install lines for oil cooler a...

Looking for modifications for your u13?

Modifications of a buddies u13. Enjoy! Engine: Hot Shot 4-2-1 Header ($315) Place Racing CAI ($135) Dynomax ST Muffler($40) Catco Cat ($60) Active Tuning Grounding Kit ($40) NGK Iridium Spark Plugs ($30) NGK Spark Plug Wires ($30) Suspension: Ground Control Coilovers ($230) Tokico (Blue) HP Struts ($270) Focuz Strut Bar ($25) OBX Camber Bolts ($20) Wheels/Tires: 17" 2003 Spec-V Wheels ($250)  Hankook 225/45/17 ($250)  15" Winter Steelies on Dunlop Winters ($340)  Audio: 2 10" MTX Thunder 3000's (FREE) Dual 460 Watts Amplifier ($60) Aiwa CDC-X136 (FREE) Custom Enclosure ($30) Exterior: Window Tint ($120) Side Moldings off (FREE) Debadged (FREE) Flip-Trunk Mod ($5) Painted Calipers RED ($5) Painted Drums BLACK ($5) Clear Side Markers ($15) Accord Lip OEM SE Sideskirts($150) Interior: Levoc AT Shifter ($35) Custom Painted Dash ($20) Custom Vinyl Door Fabric ($20) Custom Switch Panel ($15) Custom Carpet ($35)

Nissan Altima U-13 Service manual

1993 - 2009 Nissan Altima service manuals! https://www.cardiagn.com/1993-2009-nissan-altima-factory-service-manuals-pdf/ https://www.cardiagn.com/1993-2009-nissan-altima-factory-service-manuals-pdf/